Engraving to Printing: The End of May
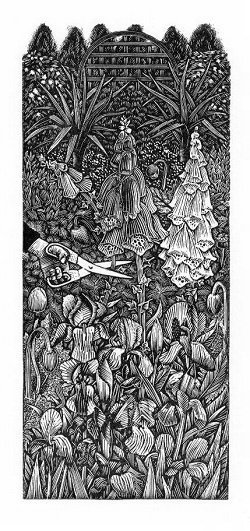
This engraving started with a series of drawings of the plants in our front garden.

These were developed into a design, which included the arm of one of my sons, wielding a pair of scissors.
The image was engraved on a piece of lemonwood. The mirror-like surface has been darkened with ink so that I can see the cuts that I make with the engraving tools. The block rests on a sandbag.

I carry on until I am more or less happy with the image on the block.

I fix it into the press. I have an old Vandercook proofing press, made in Chicago. The block is held in place with wooden and plastic strips called "furniture" and tightened with "quoins" I am tightening a "quoin" in this picture:

The block is now fixed securely in the press.

The block is inked with a roller (sometimes called a brayer). Paper is placed over the block and the large roller on the top of the press is carefully pulled over the paper, squeezing it against the block and transferring the image to the paper.

The paper is carefully pulled off the block and examined. At this stage, I will usually clean the block and engrave a little more. This continues until I am just satisfied. Like with drawing and painting, it is important not to work the image too much. The block is now ready for me to print the edition.
The final print looks like this: